Recording a Cisco Webex meeting is essential for capturing details you might miss in the moment. Whether you need to share the discussion with absent colleagues or just want a personal reference, having a recording saves you from frantic note-taking. (For more meeting tips, check our Meeting Productivity Hub).
However, depending on your role (host vs. participant) and your Webex plan, the process varies significantly. This guide covers both the native method (for hosts) and alternative tools (for participants or those who need better transcripts).
Quick Summary
- Hosts can record directly within the Webex app (to cloud or computer).
- Participants generally cannot record natively without being assigned privileges.
- Native recordings often lack automatic transcription or searchable summaries on basic plans.
- Third-party tools (like Fonnos) allow anyone to record and generate AI notes.
Method 1: The Native Way (Built-in Recorder)
If you are the meeting host (or a co-host with permissions), Webex provides a built-in recording feature. This is the most straightforward method if you simply need a video file of the session.
- Start your Webex meeting as the host.
- Click the Record button in the bottom control bar (look for the circle icon).
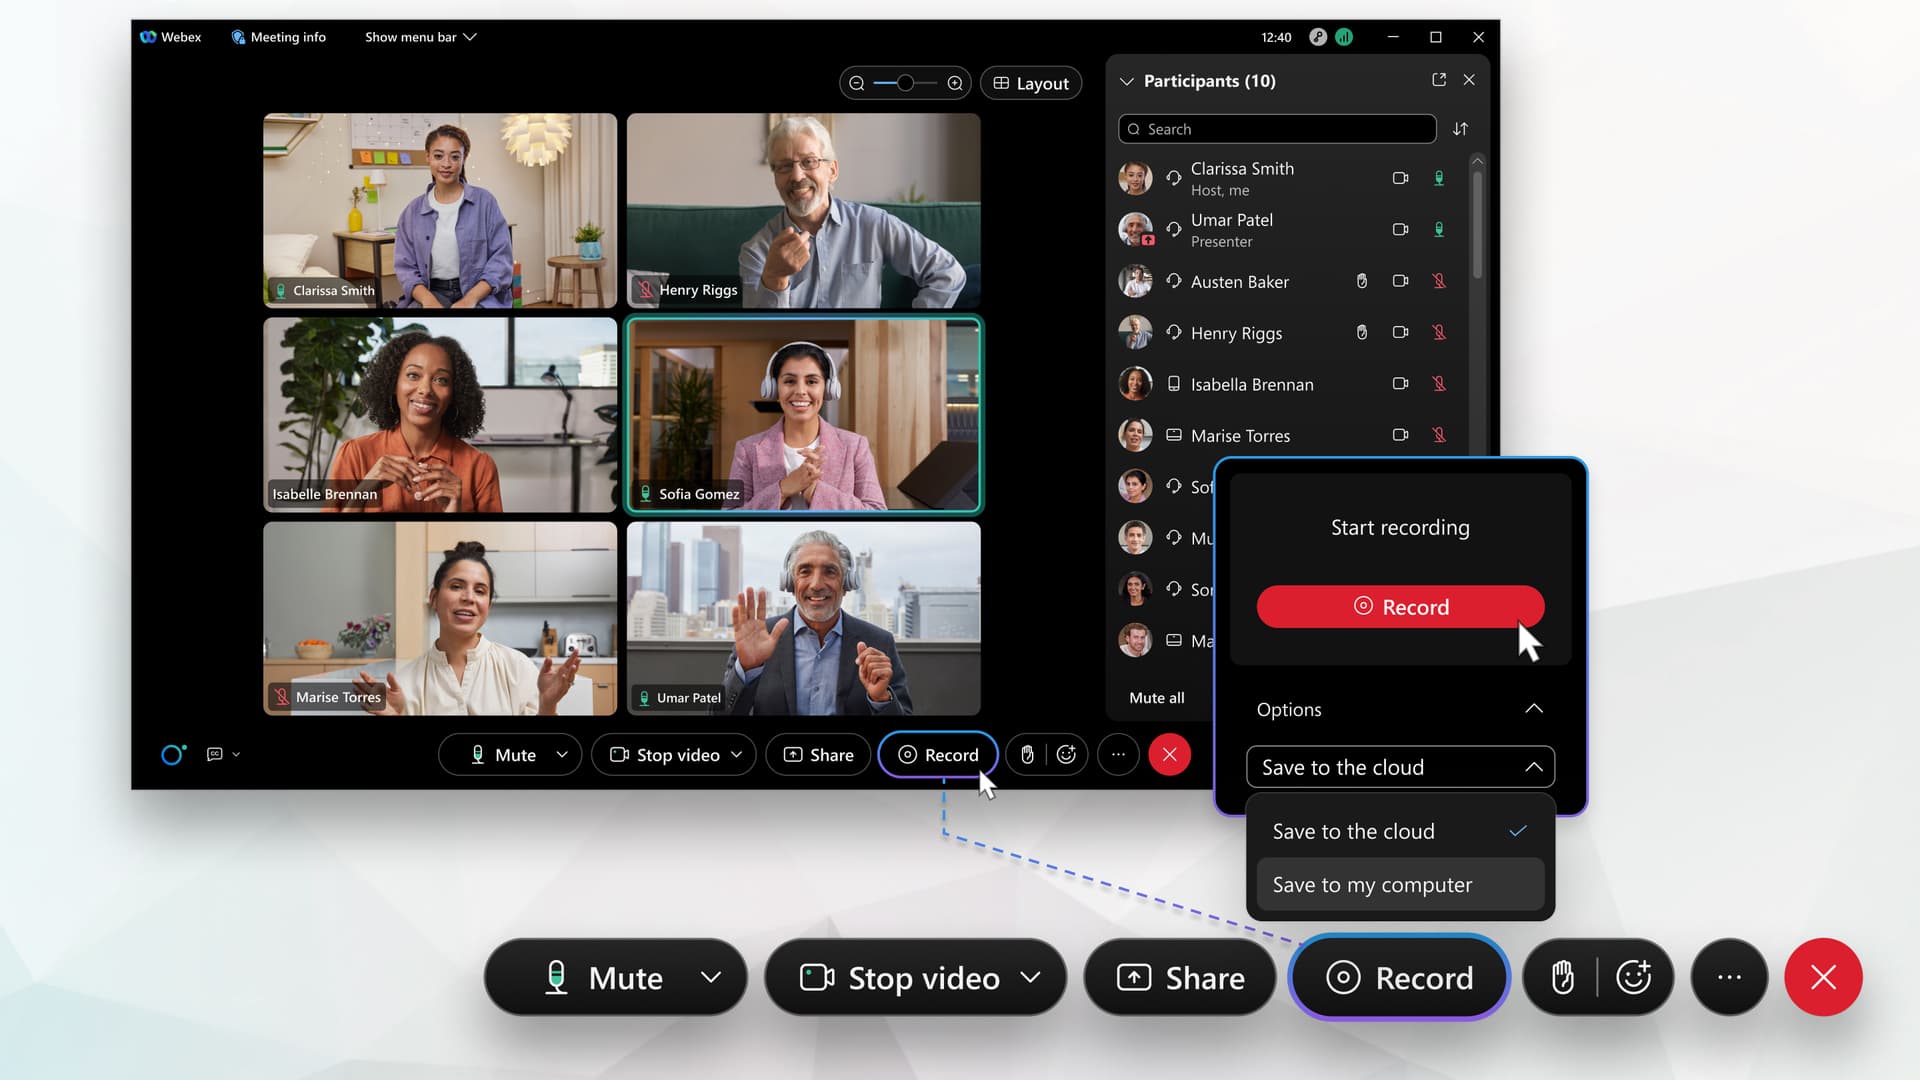
- Choose your destination:
- Record to cloud: Saves to your Webex account online (usually requires a paid plan).
- Record on my computer: Saves a local MP4 file to your hard drive.
- Click Record. You'll see a red indicator showing recording is active.
Note: If the record button is greyed out or missing, your account administrator may have disabled it, or you are not a host/co-host.
Why Native Solutions Fall Short
While the built-in recorder is convenient for hosts, many professionals hit a wall when they need more flexibility:
- Host-Only Access: Participants typically can't record directly. If the host forgets to press record, the content is lost forever.
- Storage Limits: Cloud recordings consume quota quickly, and local files are hard to share.
- Manual Review: You get a video file, but without expensive add-ons, you don't get a searchable transcript. You have to re-watch the whole video to find one specific point.
- Limited Searchability: Finding specific topics or tasks in a raw video file is time-consuming.
Testing Note
On macOS Sonoma, we observed occasional audio/video desynchronization in Webex playback after seeking forward in long recordings (≈1 hour+).
This is where specialized meeting recording software becomes valuable.
Method 2: Advanced / Professional Workflow
If you aren't the host, or if you need more than just a raw video file—like searchable text, summaries, or extracted action items—a dedicated desktop tool is often the better choice.
Tools like Fonnos run alongside Webex, capturing both your screen and system audio regardless of your meeting permissions. It acts as your personal AI note-taker, ensuring you never miss a detail even if you aren't leading the call.
How to Record a Webex Meeting with Fonnos
Follow these simple steps to record your Cisco Webex meeting using Fonnos:
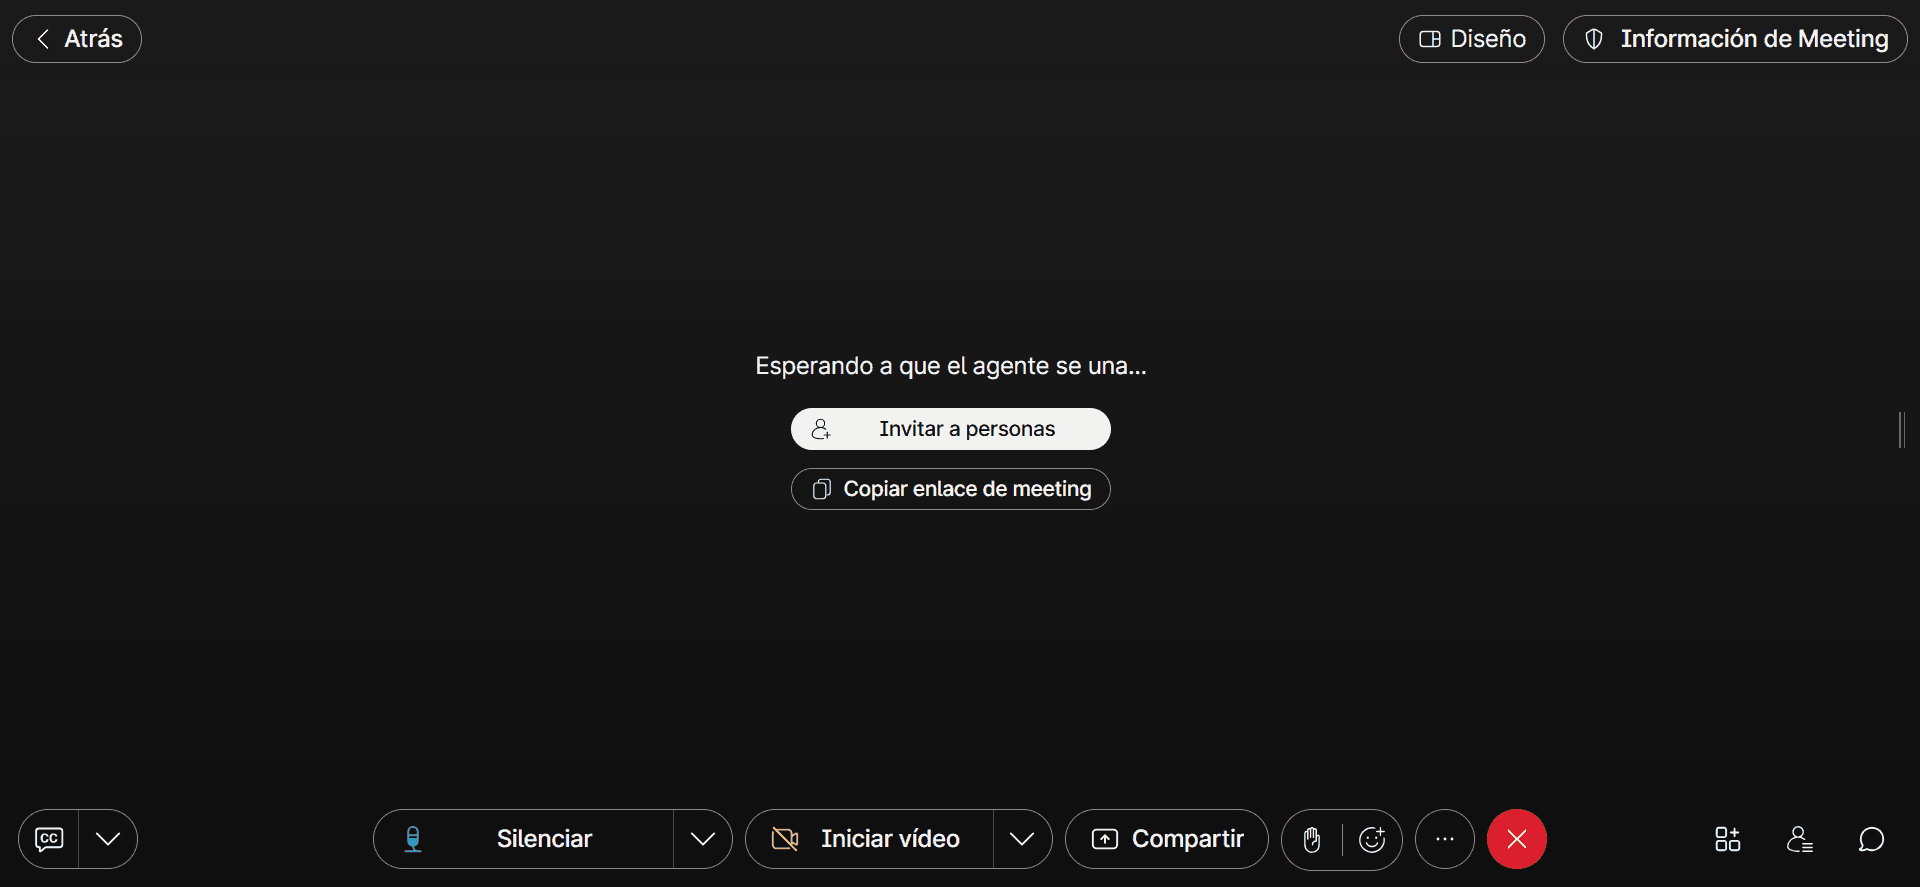
- Join the Webex Meeting.
Wait for the host to join the Webex meeting, during which you can invite others or copy the meeting link for sharing.

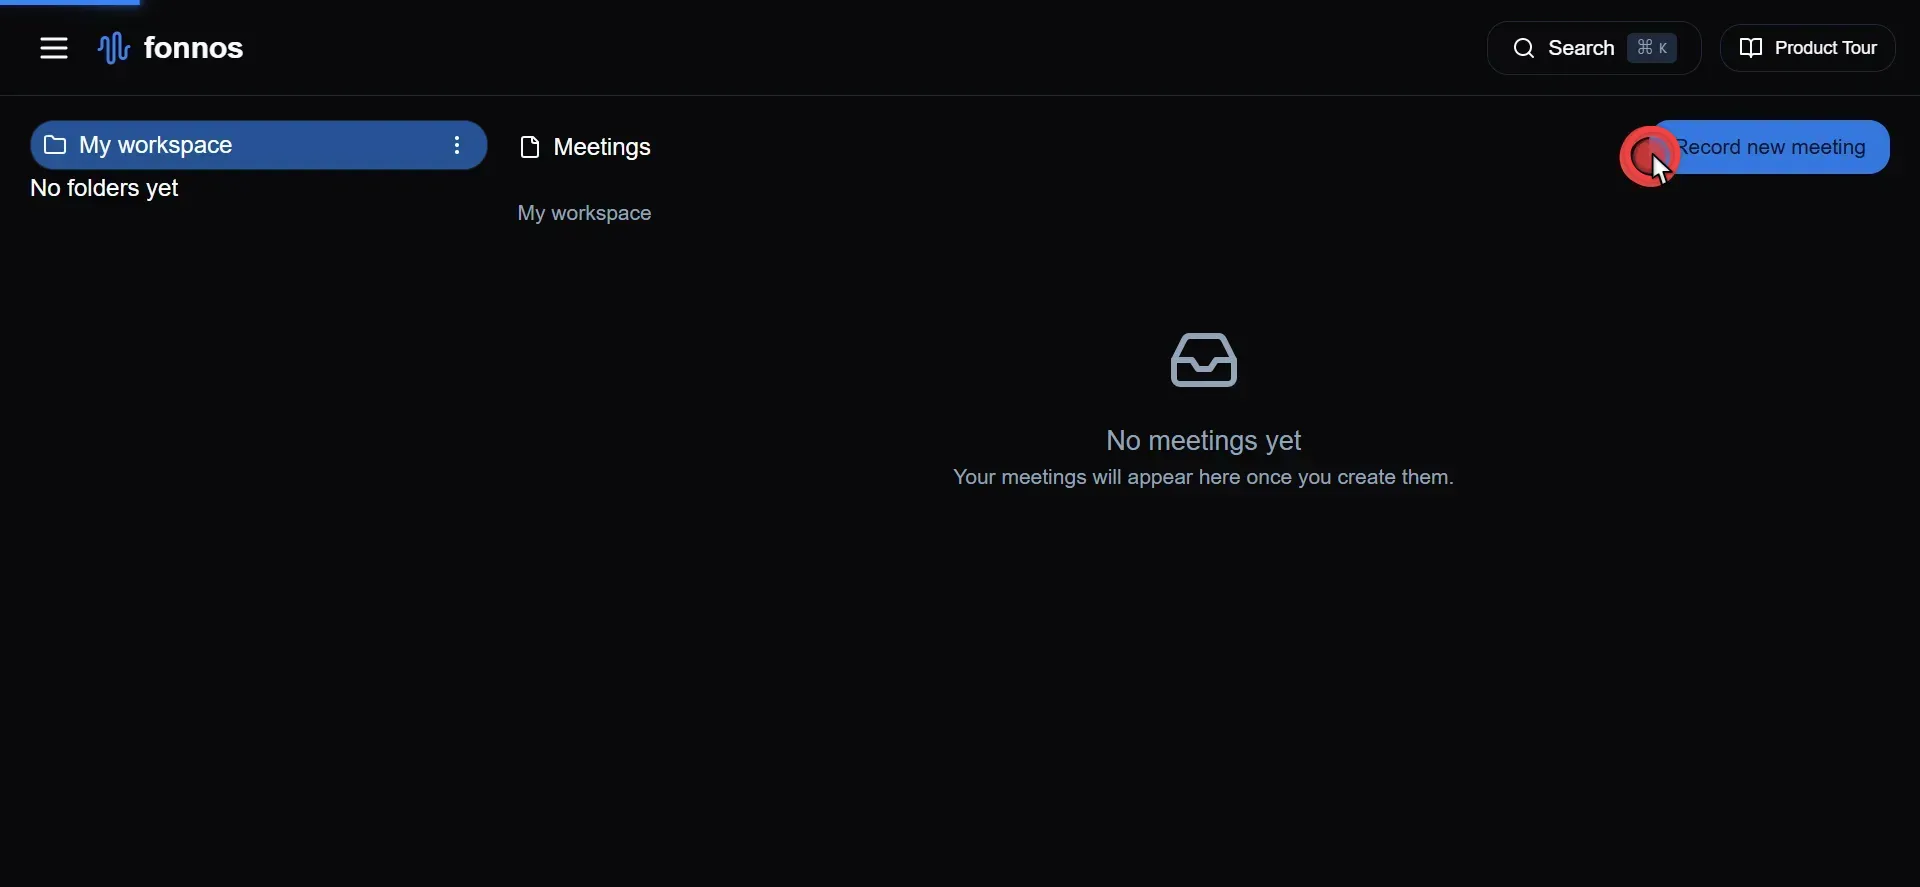
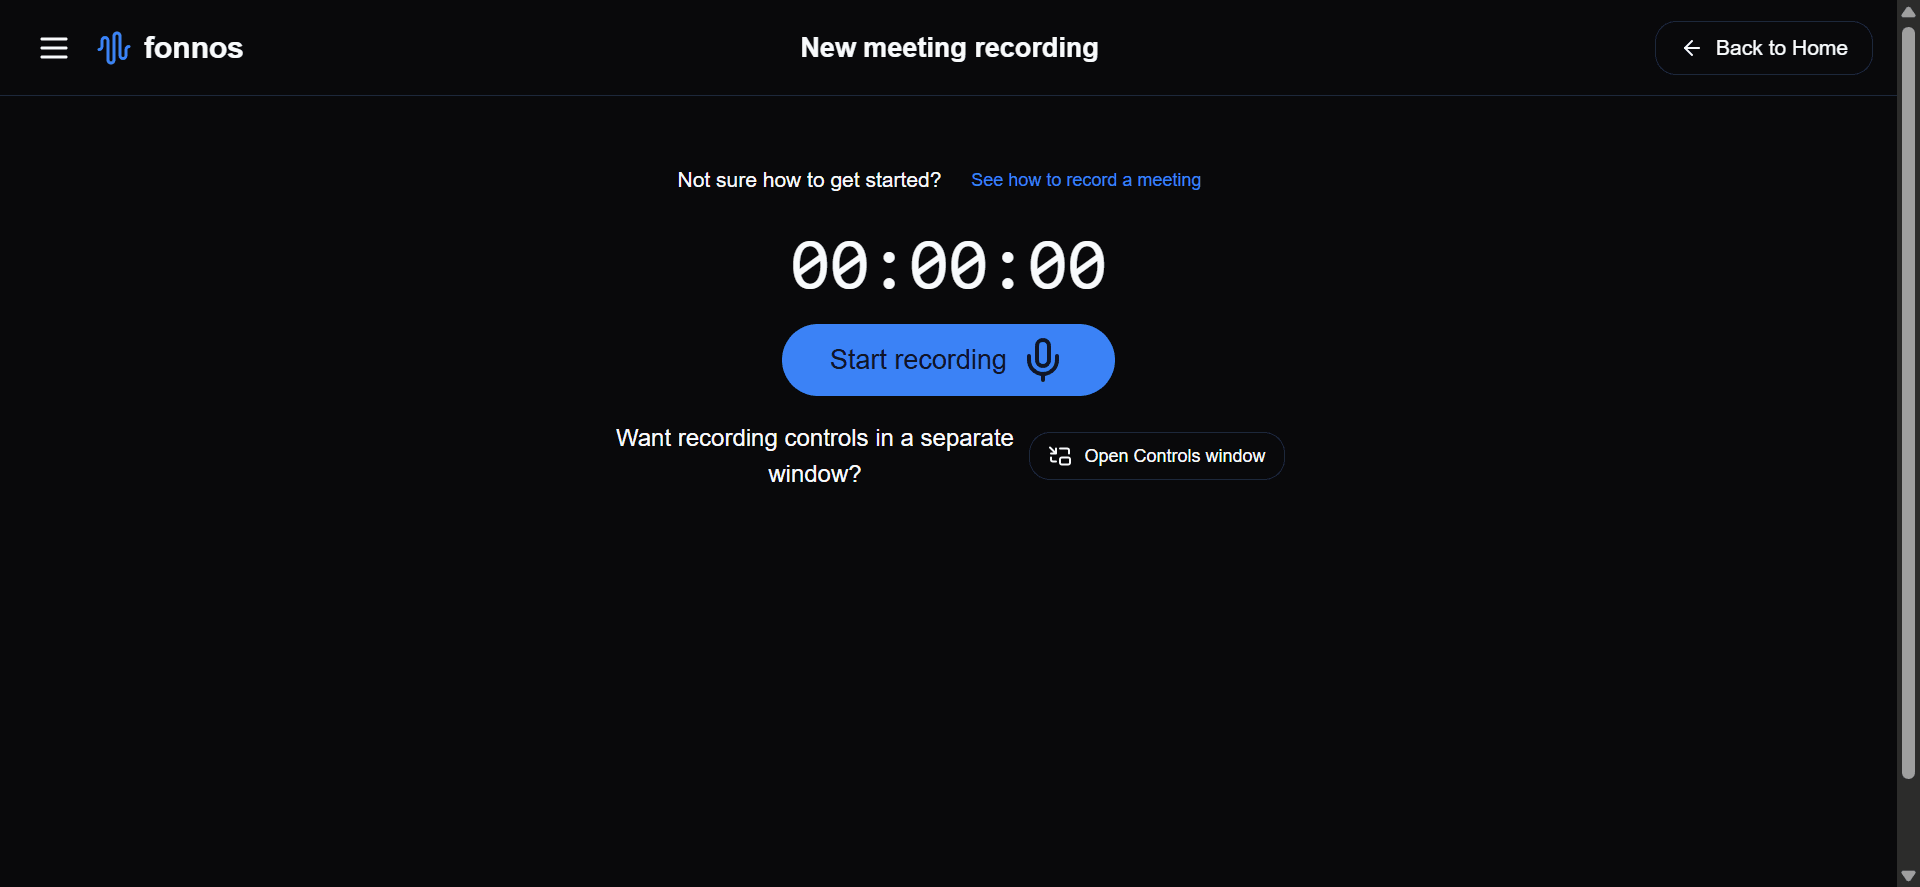
- Start a New Recording Session in Fonnos.
Navigate to Fonnos.com and initiate a new recording by clicking on "Record new meeting".
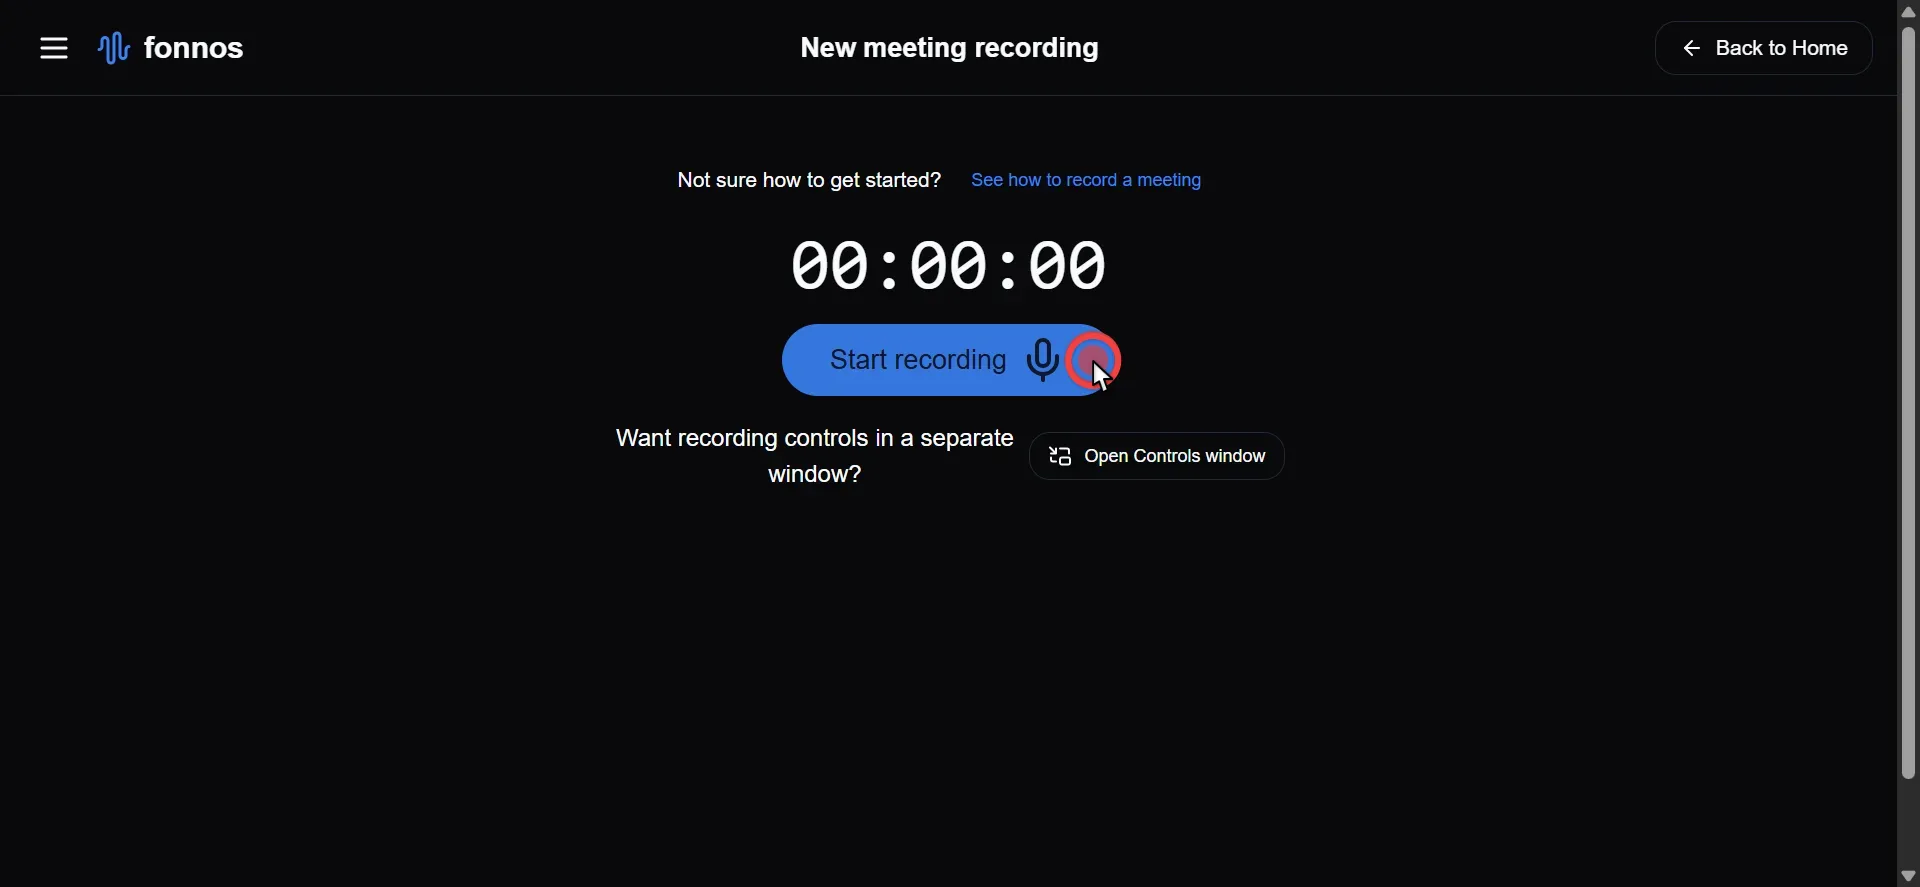
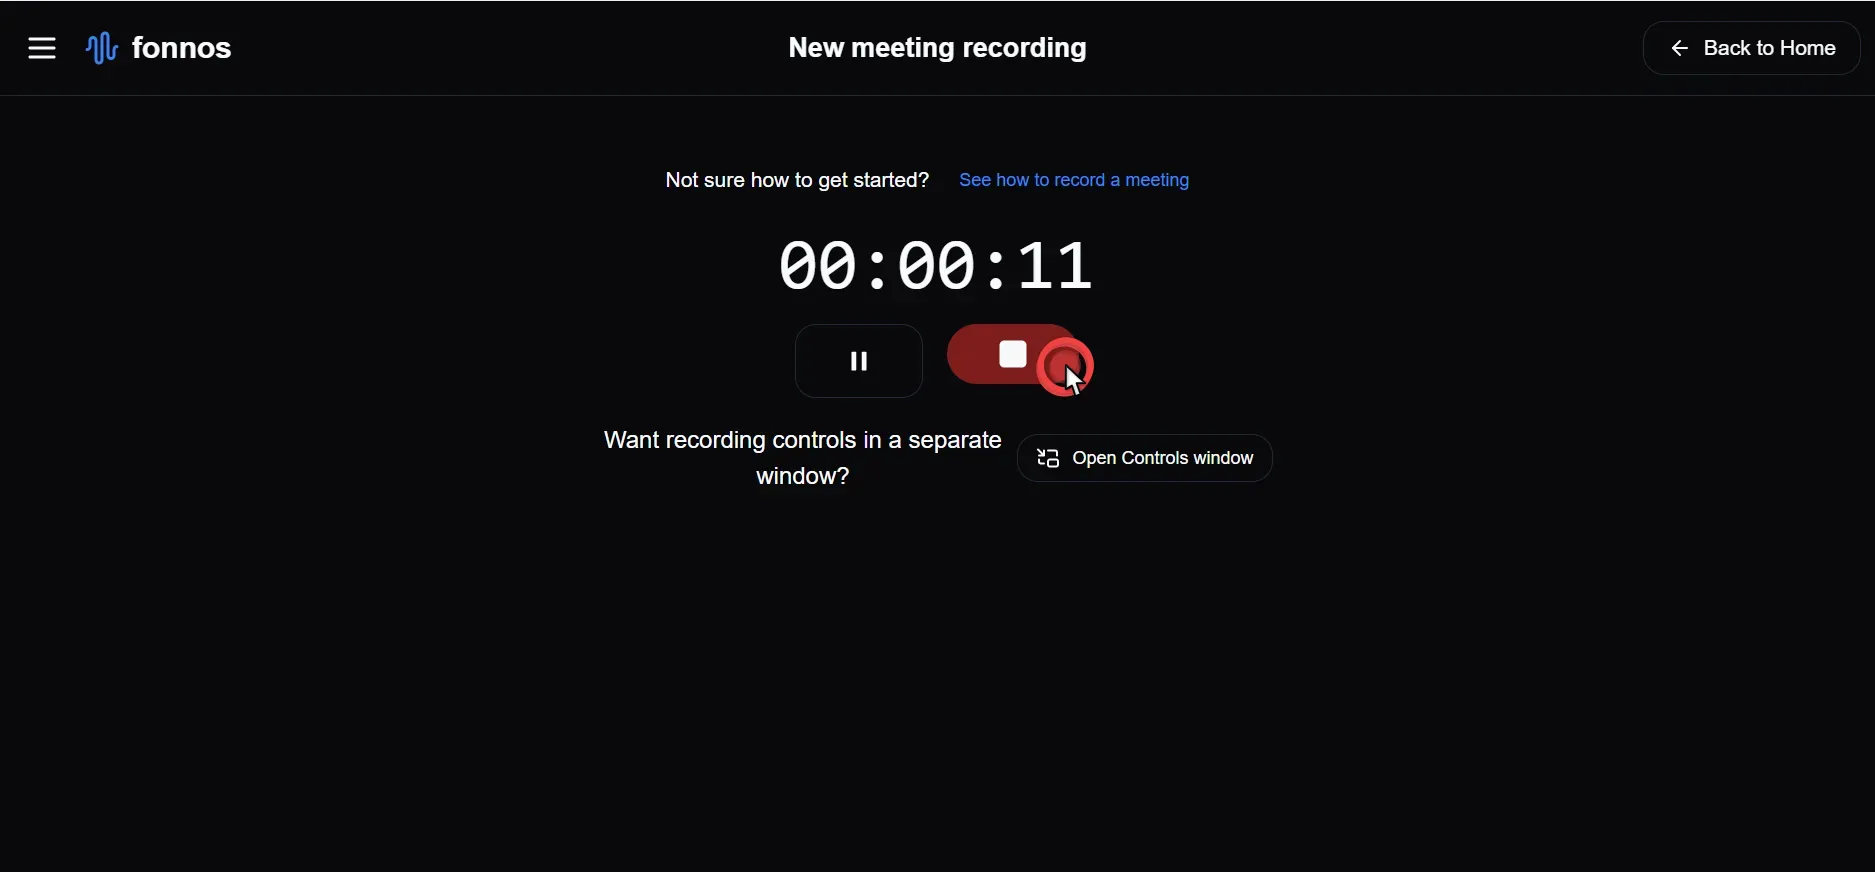
- Activate Screen and Audio Recording.
Begin the recording session by clicking "Start recording", capturing both your screen and system audio.
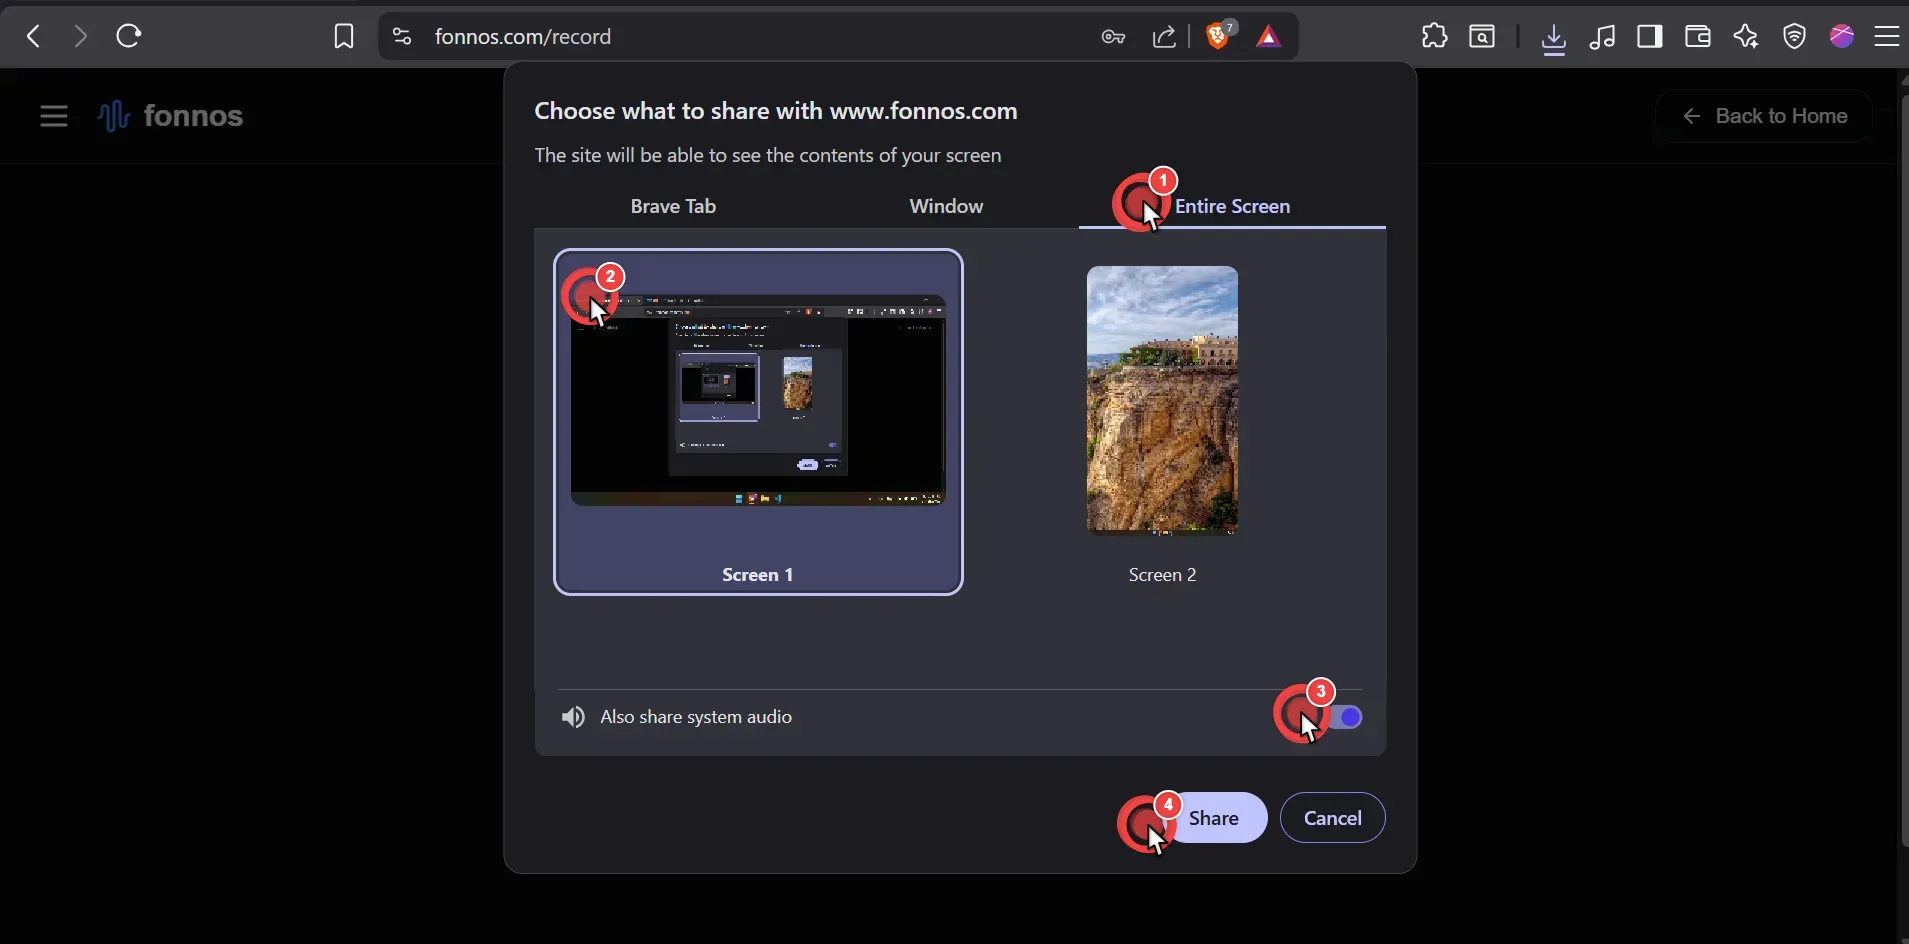
- Share Entire Screen and System Audio.
It's crucial to share your entire screen and enable the "Also share system audio" option for comprehensive recording.
- Fonnos Records the Meeting.
After setting up your screen and audio sharing, Fonnos will automatically start recording the meeting.

- Continue with the Meeting.
Proceed with your meeting as usual after ensuring the recording is set up correctly.
- Stop the Recording.
Once the meeting is concluded, stop the recording by clicking the "Stop" button on Fonnos.
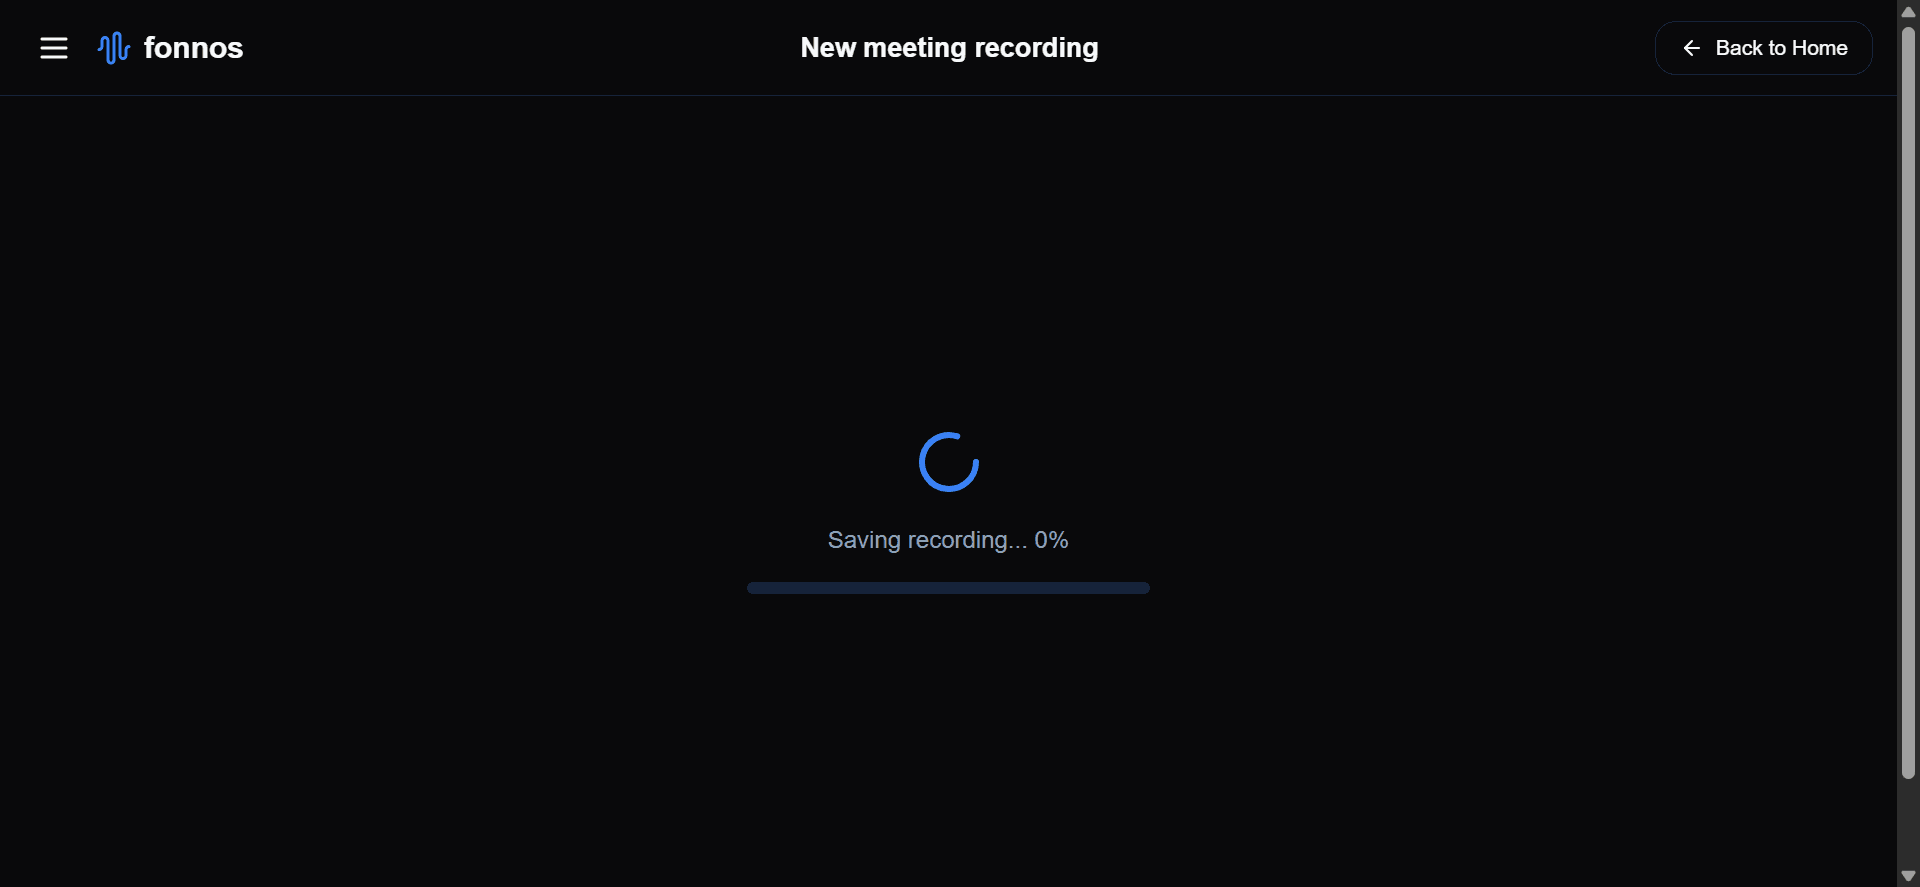
- Wait for Recording to Save.
After stopping the recording, wait a moment for the file to be saved and secured.
- Ready for Another Recording.
Immediately after saving, you can start a new recording session if needed.
Make Your Recordings Searchable
Recording the meeting is just the first step. The real value comes from what you can do with that data afterward. Here is how modern tools transform a static video file into a productivity asset.
Read Instead of Rewatch
Instead of sitting through a 60-minute replay, you can scan an accurate transcript. Identify participants, key topics, and pivotal moments in seconds.

Never Miss an Action Item
Smart tools automatically extract to-do lists and deadlines from your conversation. This ensures accountability without the need for manual note-taking during the call.

Ask Your Meeting Questions
Need to recall a specific detail? Use a conversational AI assistant to ask questions like:
- "When is the project deadline?"
- "What did the client say about the new design?"
The system pinpoints the exact answer and timestamp, saving you hours of searching.

Real-World Use Cases
Enhanced recording capabilities are particularly useful in these scenarios:
Client Meetings
Track client feedback and requirements precisely. Use the transcript to verify agreements and ensure nothing is lost in translation.
Team Collaborations
Internal brainstorming sessions often move fast. Capture every idea and allow team members to engage fully instead of writing notes.
Training Sessions
Build a library of training resources. New hires can watch past sessions or read summaries to get up to speed quickly.
Important: Recording Ethics
Always ensure you are recording responsibly:
- Consent: Ask participants before recording.
- Notification: Ensure everyone knows the session is being captured.
- Compliance: Check local laws regarding audio recording (one-party vs. two-party consent).
FAQs About Recording Webex Meetings
Conclusion
For many users, the native Webex recorder is sufficient for basic needs. But if you require accessibility for participants,better searchability, or automated notes, built-in tools may limit your productivity.
Using a dedicated tool like Fonnos ensures you capture every detail, regardless of your role in the meeting, and turns that video into actionable data.
Ready to upgrade your meeting notes? Try recording your next Webex call with Fonnos.